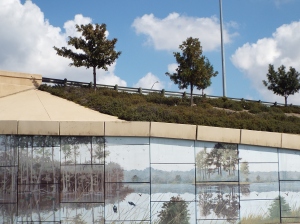
Section of Interstate 30 overpass mural in Grand Prairie, Texas
Shooting good-looking photos has become so simple these days that it’s easy to ignore the factors that separate Facebook snapshots from really distinctive images. Precisely because digital photography and editing are so simple, making your own photos stand out—whether across social media, in publications or mounted on a wall—requires looking at more than the viewfinder or screen. You should consider all of the environment surrounding the photo subject and find the elements that can serve as a theme for your images.
These six tips can help you widen your viewpoint on the photos you shoot and produce a more memorable visual experience.
- Study the pieces of your subject, not just the totality. In the Dallas area, scores of highway bridges are really works of art, with roadbeds soaring the height of skyscrapers and intertwined cloverleafs that would attract the cameras of any passenger. But serious photographers who take the time to look most closely will discover actual works of art subtly embossed, carved and painted on bridge pillars and abutments. Horses, stars, windmills, even full-color murals decorate these bridges, although average passers-by may overlook them. Examine the pieces of your subjects, and you may discover a much better focal point than your initial idea.
- Place people in environments that reflect their personalities. The average photographer will take a head-and-shoulders close-up of his subject with little regard for surroundings, other than ensuring the person doesn’t blend into the background colors and patterns. Think instead of finding an environment that tells a story about the person. The best portrait photographers position their subjects surrounded by hobbies, pets, people, cityscapes or natural settings that give us insights into their predilections before we even ready the caption. For headshot portraits, put away the “portrait lens” and shoot the subject close up with a 35 mm (wide-angle) lens to incorporate more of the environment around him without distortions.
- Consider the weather and the time of day. If you want to photograph a store owner as she first opens her door to foot traffic, plan the opening for a time of day when the front of the building is washed in unbroken light and is not buried in murky shadows. Often an overcast (but not dark) day can present a great photo opportunity because the light is very evenly distributed and shadows don’t exist. Very bright days, on the other hand, can create strong contrasts that envelop important details in dark shadows while blowing out sunny portions of the scene. Sometimes sharp shadows can be incorporated for effect—for example, the shadows of a crowd gathered outside the image area, suggesting intense interest and attention—but avoid situations where shadows speckle faces or cover visual details. Additionally, shooting near sunrise or sunset can infuse the environment, as well as your subject, with colors not attainable at other times of day.
- Crop your shot in the camera. You’ll certainly be able to crop your photos in a digital editing program back at your desk—and often creative cropping will make the difference between a good photo and an outstanding one—but make your best efforts to crop the image when you shoot it. If you leave too much headroom, for example, you may be forced to incorporate unwanted elements toward the bottom of the image when you crop it later or, to eliminate them, enlarge the image in a way that loses other surrounding details that you wanted to keep. The best images result when the camera, not the editing software, is employed as the creative tool.
- Find a focal point for your panoramas. When shooting naturally gorgeous landscapes, broad skylines, open fields and even construction sites, don’t just shorten your lens, point and shoot. Each of these types of scenes should be built around a focal point: the tallest of the mountains at one edge of the image with the rest of the ridge tumbling from it across the frame, a unique building positioned so that those around it seem to be aspiring to its height or design, the close-up head of a grazing horse in the lower right of a wide pastoral image, a front-loader appearing to carry buildings under construction. Give the panorama a point and a purpose.
- Shoot at your subject’s level. Especially when photographing children, don’t simply stand five feet in front of them and shoot them crawling toward the camera. Get down on the floor, at the child’s eye level, and shoot from there. You’ll be amazed at the creative difference this perspective makes. The same applies to shots of everything from animals to sporting events. Rather than observing your subject from above, insert your lens into the scene by changing your viewpoint.
Consider your photo shoot to be an opportunity not just to record what you see but to create new perceptions of your subjects and new conversations around your outstanding images.

Six Tips for Shooting Outstanding Photos
Posted on September 29, 2014
0
Section of Interstate 30 overpass mural in Grand Prairie, Texas
Shooting good-looking photos has become so simple these days that it’s easy to ignore the factors that separate Facebook snapshots from really distinctive images. Precisely because digital photography and editing are so simple, making your own photos stand out—whether across social media, in publications or mounted on a wall—requires looking at more than the viewfinder or screen. You should consider all of the environment surrounding the photo subject and find the elements that can serve as a theme for your images.
These six tips can help you widen your viewpoint on the photos you shoot and produce a more memorable visual experience.
Consider your photo shoot to be an opportunity not just to record what you see but to create new perceptions of your subjects and new conversations around your outstanding images.
Rate this:
Related